Spent the weekend in Morzine. I arrived on Friday evening to find Rob and Mat around a camp fire after a barbecue I just missed. Rob had been up a mountain with one of his children and a friend and had come down that afternoon. Mat is there to create robs decking masterpiece. It all looks very good, a little springy but it all looks great it really finishes of the surrounds to robs chalet, especially the front door. I dont have any pictures of it, as I only had my phone with me and the camera is rubbish on the phone (as I will show later). Well Saturday rolled around and I went as usual into town to do my chores, visit the bank and go to Voirons to get supplies.
I need the bank to lend me lots of money as I don't have any and my personnel friendly bank manager has disappeared and is not responding to his email. I discover that he has moved on and his replacement is not available for a meeting until Friday. Not very helpful. So I resolve to phone and email her when I return. That's my job when I finish writing this.
Next was Voirons, this time it was gaine and some plastic boxes to hold plugs and switches. I had worked out what I wanted where inside the walls. Plug sockets heaters lights and lights switches, but as usual the plan needed changing almost immediately.
There needs to be a heater in the drying/store room as this will hopefully heat the center of the house as well. The heater needs its own electric supply so that's one line of 2.5mm cable (each of the three wires in the cable is 2.5 square mm in cross section, the whole cable is actually about 10mm diameter) This needed running to the far wall. I think that the hot room heater will probably go on the same circuit as the drying room heater, not sure yet as it may be nice to keep the hot room independent of any thing else. There need to be plug sockets if only for the washing machine and dryer (which should go in the alcove under the stairs) Plug sockets can be chained together up to a point and as good practice I run all the plugs on 2.5 mm cable as well. I have all double sockets and have added another in the garage on the other side of the wall. All these sockets will be powered from the same trip in the consumer unit. This is another run of cable, The lights or at least the switch for the lights required yet another run of cable. For this I was going to use 1.5mm cable but I did not have any so I used three 1.5 mm separate strands of wire run through the gaine for the switch.
The lighting posed a few problems, (which are not fully resolved yet) My intention is that there will be a light on each of the four levels of the central staircase. and that on each level a single switch can turn on or off ALL the lights on all four levels. Now this is possible (apparently) with a load of wire and complicated three way double rocker switches, but I have looked and looked and not found a easy way to do it. So I have opted for the French way! What I plan is to install what amounts to a relay in the consumer unit and push button switches on each level. The switches are chained together in parallel on one side of the relay and the lights are chained together in parallel on the other. Any one of the push buttons can turn on or off all the lights.
So I start drilling holes through all the uprights in the new wall for the gaine and wires to go through and after a bit of repair with a metal file I discover that my big drill (the one I ruined earlier) is not quite ruined and is in fact quite good still as long as I dont hit any more metal stuff!. So the holes are drilled and the cable and gaine threaded around
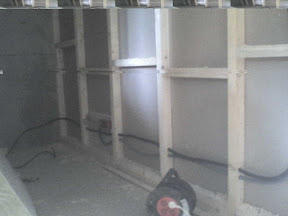


This wall needs to be insulated. Rob donated some large furry sheets of rock wool insulation that he previously used on his garage doors. It is about 200mm wide, uncompressed and should be a good insulator. I have to split it in half to make it this enough to fit inside the walls and still be able to panel the side.
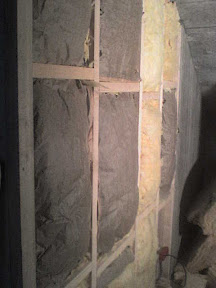
 Up goes the plaster board and voila there is a wall.
Hard bits include moving a sheet of plaster board (not light) on my own, that is 1.2 meters wide and just a fraction less than the floor to ceiling height high. Plaster board is quite brittle and bends only so much before snapping. corners get crushed if the weight of a whole board. rests on it. Cutting the holes of the plug sockets is tricky to get right and I am not convinced I have done it properly, we will see. In order to see where the cut out should be you rub chalk or marker pen over the edges of the box fixed in the wall then offer up the plaster board to press against the boxes. hopefully and actually it worked remarkably well, the marks transfer to the plaster board giving you a nice outline of where to cut out.
In the last photo you can see the switch with three wires coming out of it. This was the first time I have installed separate wires rather than cable and I was determined to try the official French method as suggested in my electrics book. I was surprised to find it actually worked really well! The separate wires all pulled through very easily. I can only assume that the system is not designed for cables but it designed for wires.
With still no doors to install I moved on upstairs to the bathroom/bedroom walls. This were a little easier and needed a slightly different insulation as I want to stop sound more than heat.
 This stuff is rigid and cuts really well so you just carve it into the gaps. then plaster board up!
 Again, voila walls!
There is a comedy series on TV called Absolutely Fabulous and in one episode the kitchen burns down and Jennifer Saunders spends the next three months trying to decide what design her new kitchen will be. After three months she has made a decision, she now knows what door handle she wants. Well I feel like that about my front door handle. I have been trying for months to get the right door handle to fit properly. How hard is it? First of all the square piece that actually does the work was too short to connect the handles. Then the replacement was too thick to fit in the door. Then the replacements replacement was too short. Chopping up the two short sections to make a longer one did not work. Then I finally found a section that fit in the lock and was just big enough to connect to the handles, then the slots cut (for some strange reason) in the section caused the handles to spin on the section. I am fed up of door handles but I think I might have fixed it. I have wedged slivers of metal into these stupid slots and now the handles can grip the section properly. Problem now is that with all the messing around I seem to have lost one side of the door handles!
Any way I left on Monday afternoon reasonably happy with what I had done this weekend and full of plans for the next trip, which will probably be around 1st of June to help Mat with the painting.
That reminds me, I really should get in touch with the bank now....