Wednesday, January 24, 2007
Managing the Bank Manager
The bank has just gone down in my estimation.
This morning Hervè sent me an email asking that I pay the last invoices he gave me.
This was a surprise as I had sent the invoices and instructions to pay them to the bank ages ago. So I tried to phone the bank but could not speak to the right person so I sent them an email asking what had happened and enclosing a copy of the email requesting payment.
Now I get an email saying "Oh yes I made a mistake and they haven't been paid but I will pay them today." ????
Great, I cant trust the bank to pay the invoices. So in the future the bank will need chasing each day to ensure the invoices are actually paid.
Only in France!
Friday, January 19, 2007
P.P.P.P.P.P.
A friend of mine once quoted the six P's of any Project "Proper Planning Prevents Piss Poor Performance". Well I have been planning this enterprise for about six years so we shall see how this cliché stands up.
A lot of the planing recently has been around the electrics. What is the best way to install the electrics in my chalet? Well the French electric book is a gold mine of information, extremely useful and not as difficult to read/translate as I imagined it might be. After all, the subject matter is fairly narrow and it doesn't take much to figure out if the book is saying do this or don't do this.
Hmmmm. Sounds like famous last words!.
The consumer unit is the box that houses all the trips and RCD's and what not that distribute the electricity around the house. What used to be fuse boxes and now is Micro Circuit Breakers (MCB) or Residual Current Detectors (RCD). This is basically a largish box on the wall with three, maybe four rows of trip switches in it. Each row starts with a big switch called the Interrupteur differential which is and RCD on the the earth and trips the power to that row if it detects any current flow in the earth for that row. (I think ?) The row contains several smaller trip switches or MCB called disjocteur divisionnaire These are rated in Amps and will trip if the current in that circuit exceeds the rated amount.
So as I understand it you are protected from overloading by the disjocteur divisionnaire and from electrocution by the Interrupteur differential.
So what I have to do now is figure out what stuff I need/want in the chalet that will use electricity and where it will be and then figure out how to get the wire to it, then figure out which trip the wire should be attached to and ....and...
Planning the plug sockets is pretty easy, there is a minimum requirement for each room and you are allowed 5 sockets (or equivalent, double sockets apparently count as one, but triple sockets count as two) on 1.5mm cable spur and 8 sockets on a 2.5mm cable spur. Each of these spurs needs a trip on the consumer unit. I worked out that I wanted about 54 sockets through out the chalet which is just a bit more than the minimum allowed. That's a minimum of 7 trips but more like 10 trips just for the normal sockets. Then there are the dedicated sockets/power outlets for the main appliances in the chalet, Oven, hob, freezer, washing machine, dryer, dishwasher and seemingly any other major appliance. I think I will put an extra one in for the microwave as well. Each of these needs its own trip, that is another seven.
The lights are harder to plan the routes for, as you need to figure in the switches as well. A minimum of 19 lamps that I will increase to 26. A lighting circuit can have up to 8 lamps on it and uses 1.5mm cable. So that is at least another 4 trips.
That is about 21 trips and still we have the heating and hot water to add in!
But the hardest part of all this is deciding where the actual wires should run, where to put the gaine! Some of these problems will be solved by using false walls or wooded panelling over the concrete walls and using the space between to run the cables, but this cant solve everything. At some stage I need to mark out boxes and cable runs on the concrete and cut it out. It will be easier to cut these chases down from switch to floor but most of the time it is going to be up from switch to ceiling. Sounds fun. And the light itself, how do make a hole big enough in the ceiling, do it from above which is certainly easier but needs to make a big hole all the way through. Or from below which will be harder work just holding the drill up let alone applying pressure to the bit. I suppose its a case of suck it and see try both and see which is more effective.
I should be going back out there soon, so I will have to decide what I am going to do. Drill some holes in the concrete I think!
Tuesday, January 09, 2007
Electric Book
The French book on electricity installations l'installation èlectrique has arrived. It would have been useful a few days ago but never mind. I must get my French dictionary out and have a good read through it to try and understand what I need to do.
Sunday, January 07, 2007
Quite a hard days work
Well it's Sunday night and I am knackered. Ohmri, my son, and I took the train to Geneva from Zürich at 2:00 on Friday afternoon and arrived at the chalets at about 8:00 in the evening having stopped on the way to buy some building supplies (cable, drill bits and gaine) We were staying at Robs place while I put some gaine and cable into my place. My first impression was that Rob seems to have got the heating sorted out as the place was definitely not cold. With no effort we booted the house, turning on the water and the rest of the power. We turned the heating on in the main room and the bathroom and then I thought we should have dinner, cook pizza in the oven. Two minutes after the oven went on it all went black. I had discovered the secret of limited power. You cant have the heating, the hot water and the oven on at the same time as this draws to much power and the line trips out. This means you need to get your coat on and your boots and trudge down to the road though the snow in the dark open the power box (and normally dig the power box out of the snow) and push the trip switch back in to get the power on again. This works as long as you have actually turned something off, otherwise just as you have closed the power box and trudged back to the chalet through the snow taken your coat off and your boots the power will trip out again, meaning you have to repeat the whole operation again. Its all even more fun when you have a frightened seven and a half year old who also needs dressing and walking down through the snow and back again to be undressed and then the trip trips out again.
Anyway we sorted out the problem and with Ohmri a little nervous of being stranded in the dark we went to sleep.
The next morning after some chores, and after I discovered that I had left the cheque from the notaire in Zürich and could not pay it into the bank (annoying). We started work on the electrics int the chalet. I must admit I was quite excited about it as this is the first time I had done anything towards actually constructing my chalet. I have helped Rob many times building walls or laying cables or fixing pipes etc, but never actually done anything for myself on my chalet.
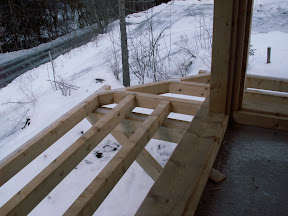 First thing to notice is the balconies. They are great. Huge chunky bits of timber bolted to the concrete. They look really nice. I am very pleased with them. I like the joints and the shear size of the timber that was used.
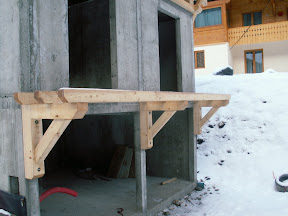
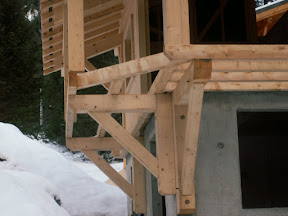
In fact I am impressed at the size of the timber that was used all over the chalet. Enormous pieces of wood.
Anyway my mission for the weekend was to install enough gaine and cable so that my life was not hell when the chippies had installed the internal skin of T&G. The more cables I could install now and run inside the walls would mean less cable I had to mount externally on the inside wall of the chalet. So a little hard work now would pay handsomely and make the chalet look a great deal better than it would with wires tacked all up the walls everywhere.
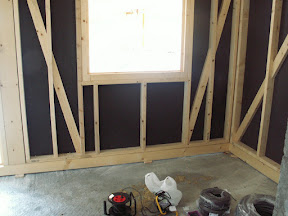
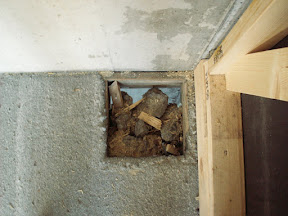
The kitchen was where I started. Firstly with a bit of demolition. The gaine and the cables have to come up through the floor somewhere as the can not come through the concrete. I am going to use the hole left for the waste water from the kitchen. Although I think that this has been put in the wrong corner. It should be on the left hand corner and it is actually in the right hand corner. No matter that can all be sorted out. My plan is build a fake wall on 2 sides of the kitchen. The third side had the window in and the forth is open to the dining room. This false wall will hide all the wiring and plumbing so I avoid having to install a huge number of wires now. This also makes the job a bit more manageable in a weekend. The third wall is the window so I set about with my plan to install the electrics in this wall as it could not really be hidden.
A hole for the waste water from the kitchen had been left in the right hand corner of the kitchen:
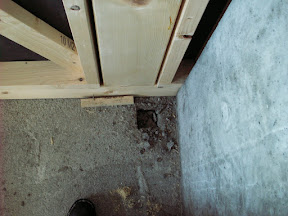
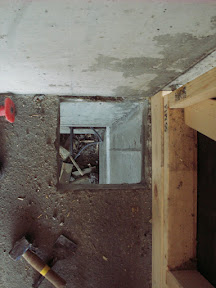
Which looked like this after about half an hour with a big hammer:
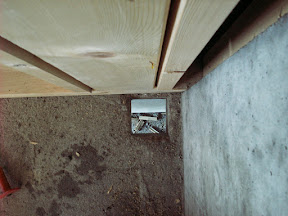
It is this hole through which all the services will run up into (and out of) the kitchen. I might move the hole later to the left hand corner or rather I might make another hole in the other corner to use instead of this one.
Anyway after a while of drilling and threading and worrying about floor heights and kitchen unit heights and lots of other worries.
 | Before and after | 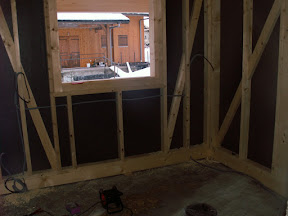 |
 Here is a closer shot. As can be seen the plastic gaine, with cable inside it goes up into the wall and the other end comes out horizontally. This horizontal portion is low enough to be under the finished floor level, in fact finished floor level is just about the top of the enormous horizontal beam on the concrete. Drilling the holes was fun as the drill bit I had bought was only 200mm long but that added to the length of the drill meant it was never going to be a straight drill. So I did it in two, well three, stages. First drill down almost as deep as the drill would go then drill in from the side about half way up the horizontal joist and at as much of an upward angle as could be achieved (not much, maybe 10 degrees). Where the two holes met (and surprisingly then usually did meet) would be nearly a right angle and the gaine, let alone the cable, would not turn that sharply, so just below the first horizontal hole I would drill another to allow a larger curve on the gaine and this proved very successful. (more than I expected anyway)
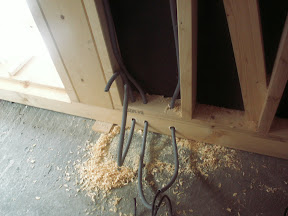
A word about gaine, some one somewhere is laughing, probably in a French accent. How hard is this stuff to use? It comes in a coil which it does not ever want to leave so it really does not want to be straight. Threaded down the tube of gaine is a little wire:
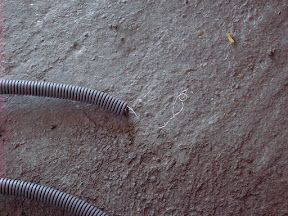 This wire is absolutely useless! You cant actually pull it out unless the gaine is absolutely straight and it hates that. I supposed that this wire might have been placed there to aid the threading of cable through the tube but that is plainly wrong. It was placed there to annoy and confuse people and to stab their fingers when they are careless.
The only way I found to successfully thread a cable through the gaine was to firstly secure one end of the gaine and straighten it all, then remove the stupid annoying little wire. Now try to push a cable down the straightened gaine. But cable also comes in a coil and it likes to stay coiled as well so you are pushing the cable that is trying to revert back into a coil down a plastic pipe that is trying to revert back to a coil and more often that not the coils are trying to revert in different directions. It becomes very difficult.
I had loads to do. Apart from the kitchen there was the dining room and salon and the entrance hallway. Each needed some attention and gaine put in the walls. Again it started with demolition. The builders had left a rather large hole in the floor of the dining room to the right of the steps:
This looked a lot better some time later after some persuasion with my friend the lump hammer.
Well the power for this side of the upstairs is all going to come up through this hole. I think it was originally designed to put the outlet pipe for the humid air up and out through a second chimney.
Using the same technique described above I put the gaine and cable in to this wall
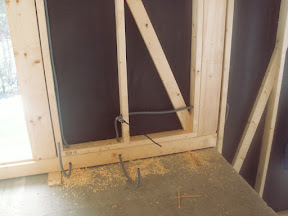
This includes a 300mm hole through one of the main supporting timber columns. This I did by drilling from either side as straight as I could and would you believe it the holes lined up so well that the gaine just pushed through!
But trouble was looming. I was trying to take a piece of gaine up into the ceiling to run a cable across one of the beams in the roof for lights, when I started drilling through metal screws.
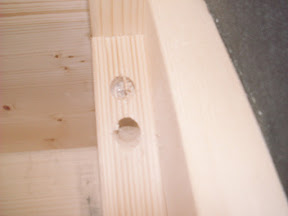 As you might make out the top hole only goes in about a centimeter then there is a shiny patch, well this shiny patch just about wrecked my expensive, just bought yesterday, oh so fine drill bit. I was a little annoyed. I mean that drill bit was good it chewed through this timber like it was butter. I had to hold it back it wanted to drill and keep drilling. But sadly after its encounter with the screw here drilling the hole underneath was a real pain it had to be pushed real hard just to get a bite and I was only about half way through the job with many more holes to drill!
I persevered and put in more gaine for plugs in the salon and the entrance hall and more gaine for external lights in the entrance hall and the kitchen.
I was working by floodlight when I finished.
Beer and food in Morzine followed quite closely by bed. I was aching all over. It has been a long time since I worked quite that hard all day. It was good though. It felt real good to have done something at last.
Sledging on Sunday was wet and cold but real good fun and we both enjoyed it despite the rain. A bit of a tidy up allowed me to imaginer the rooms and the work ahead. I reckon I need a bit more power in the walls for lights especially but that will wait until the end of Jan. It a 2 man job to getup high in the ceiling and I think I may buy another drill bit as I don't fancy messing about 20 feet up a ladder with a blunt drill!
We left Morzine at 12:00 and arrived home at 6:00, exhausted but happy.
Subscribe to:
Posts (Atom)